Honey Garlic Focaccia with Italian 00 Flour
A high-hydration, no-knead focaccia made with Italian 00 flour, finished with roasted garlic honey oil, a little hot sauce, rosemary and flaky salt. Overnight cold ferment recommended.
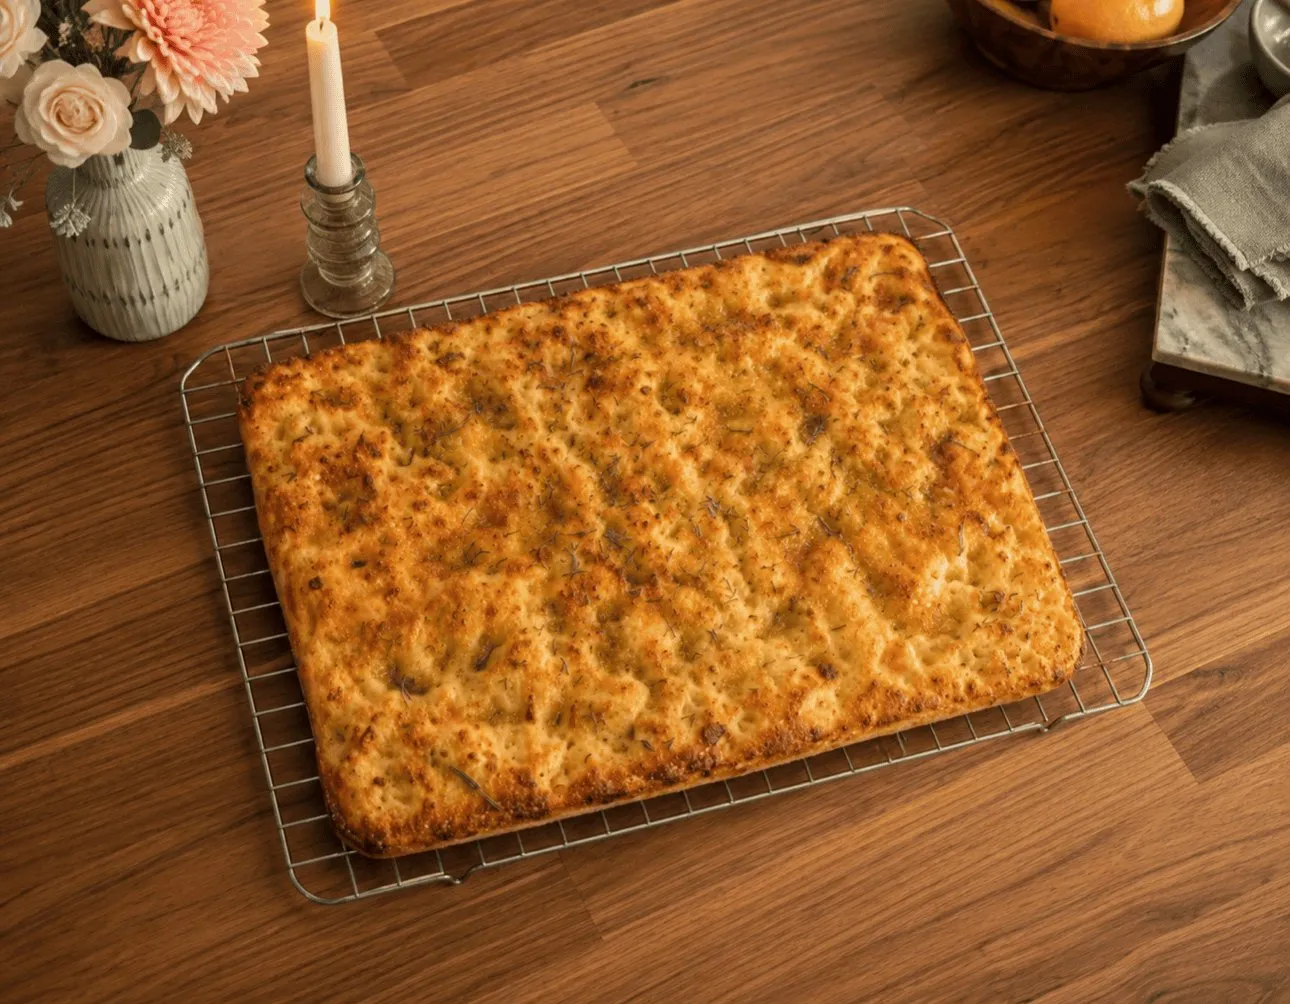
Soft and airy on the inside, golden and crisp around the edges, finished with roasted garlic, honey, fresh herbs and a touch of heat.
There are few things that make a kitchen smell quite as good as bread baking in the oven.
I originally made this focaccia for a birthday lunch I was cooking for one of my best friends. I wanted to make sandwiches, and instead of buying the bread, I decided to make the focaccia from scratch. I am very glad I did.
The result was exactly what I wanted: golden and crisp around the edges, soft and airy through the center, and covered in a roasted honey-garlic olive oil that settled into all of those classic focaccia dimples.
At the last minute, I added a little mild hot sauce to the honey-garlic oil, and that might have been my favorite decision of the entire recipe. It doesn’t make the bread spicy. It adds just enough heat and acidity to balance the sweetness of the honey, the richness of the olive oil and the mellow roasted garlic.
If you’ve never made bread from scratch, focaccia is a wonderful place to start. There’s no complicated shaping and very little hands-on work. We’re using a high-hydration dough, a few rounds of stretch-and-folds, and time to do most of the work for us.
Why Italian 00 flour?
If you’ve spent any time in my kitchen, you know I love Italian 00 flour.
One misconception worth clearing up: “00” doesn’t tell you how much protein or gluten a flour contains. It refers to how finely the flour has been milled. That very fine texture is one of the reasons I enjoy working with it.
For this focaccia, I used 500 grams of 00 flour with a relatively high amount of water to create a soft, airy interior beneath a golden exterior.
Different brands and varieties of 00 flour have different protein contents and are designed for different jobs. A 00 flour intended for pizza may behave differently from one intended for pastry, so use the gram measurements here and pay attention to the dough rather than assuming every 00 flour behaves identically.
And to be clear: I’m not choosing it because “00” makes flour healthier. I use it because I enjoy the ingredient, how it behaves, and the finished result.
The secret to airy focaccia: don’t be afraid of a wet dough
If you make this recipe and think there is absolutely no way this dough is supposed to be this sticky, you’re probably doing it right.
This recipe uses 500 g flour + 390 g water, roughly 78% hydration (the weight of the water is 78% of the weight of the flour). Higher-hydration doughs help create the open, airy crumb we want in focaccia, but they feel very different from a traditional bread dough. It will be wet. It will be sticky. Your instinct will be to add flour until it’s easier to handle.
Don’t. As the dough rests and you work through the stretch-and-folds, it develops strength and becomes noticeably easier to work with.
Tia’s tip: lightly wet or oil your hands before handling the dough. It makes a sticky dough far easier to manage without changing the flour-to-water ratio.
Why stretch and fold instead of kneading?
Traditional bread recipes call for several minutes of kneading to develop gluten. Here we take a gentler approach: rest the dough for 30 minutes, then perform a series of stretch-and-folds. Grab one side, stretch it upward, fold it back over itself, rotate the bowl and repeat around the dough. Cover, rest, and repeat four times, about 30 minutes apart.
These folds progressively strengthen the dough so it can hold onto the gases produced during fermentation, which is how we get that airy interior. Very little effort. A little patience. Really good bread.
Why I prefer an overnight cold fermentation
You can make this focaccia in one day, and the same-day option is in the recipe. But if I have the time, I make the dough the day before and let it ferment slowly in the refrigerator overnight. Slower fermentation gives the dough more time to develop flavor, and it makes homemade bread convenient: do most of the work the night before and finish it the next day.
The honey garlic oil
This is the part that takes the focaccia from really good to I need another piece immediately. Instead of plain olive oil on top, we make a mixture of extra virgin olive oil, roasted garlic, honey, a little mild hot sauce, sea salt and black pepper.
Why roast the garlic? Raw garlic works, but roasting changes its character completely. The sharpness mellows and the cloves become soft, sweet and almost caramelized, so they mash straight into the oil. That sweetness pairs with the honey without making the bread taste like dessert.
The hot sauce. Not enough to make this spicy; just enough heat and acidity to balance the honey and the oil. If you love heat, add more. If you don’t, keep it subtle.
How to get those classic focaccia dimples
After the final rise, drizzle the oil generously across the surface, oil your fingertips and press them deep into the dough, almost to the bottom of the pan. Don’t be delicate. Those impressions create pockets where the oil, honey and garlic collect as the bread bakes. Finish with rosemary and flaky salt.
Making focaccia sandwiches
This was the whole reason I made the focaccia in the first place. Once the loaf is completely cool, cut it into generous squares and slice each piece horizontally. The slightly sweet, garlicky flavor is especially good with savory fillings. For my friend’s birthday lunch, I made a sweet-and-savory steak sandwich with grilled flat iron steak and caramelized onions. It’s also delicious with grilled chicken, prosciutto, mozzarella or burrata, arugula, pesto, roasted vegetables, or simply tomato and fresh herbs.
Or skip the sandwich, warm up a piece and eat it exactly as it is. No judgment here.
A recipe worth making from scratch
There’s something deeply satisfying about pulling a loaf out of the oven that you made completely from scratch, especially when you look at how simple the foundation is: flour, water, yeast, honey, sea salt, olive oil, garlic, herbs. Give those ingredients a little time and they turn into something special.
This focaccia was supposed to be the bread for the sandwiches. It ended up being one of my favorite parts of the meal, and it has earned a permanent place in my kitchen.
The recipe
Honey Garlic Focaccia with Italian 00 Flour
Ingredients
For the focaccia
For the honey garlic oil
To finish
Method
- Activate the yeast. Warm the water to approximately 100 to 110°F. Combine the water, honey and yeast in a large bowl, stir gently and let sit for 5 to 10 minutes until foamy.
- Make the dough. Add the flour, fine sea salt and olive oil. Mix until no dry pockets of flour remain. The dough will be very sticky and much wetter than a traditional bread dough. Resist the urge to add more flour. Cover and rest for 30 minutes.
- Stretch and fold. With lightly wet or oiled hands, grab one side of the dough, stretch it upward and fold it over the center. Rotate the bowl and repeat on all four sides. Cover and rest 30 minutes. Repeat until you've completed four rounds, about 30 minutes apart. The dough gets smoother and stronger each time.
- Ferment. For my preferred method, cover tightly and refrigerate overnight. For same-day focaccia, cover and let rise at room temperature until noticeably expanded and airy, generally 2 to 3 hours depending on your kitchen.
- Make the honey garlic oil. Roast the garlic cloves at 375°F for about 35 to 40 minutes, until very soft and lightly caramelized. Cool enough to handle, then mash. Combine with the olive oil, honey, hot sauce, salt and pepper. Set aside.
- Second rise. Generously coat a 9 × 13-inch baking dish with olive oil. Transfer the dough to the pan and gently stretch it toward the corners. If it springs back, let it relax for about 15 minutes and stretch again. Cover and rise for 1 to 2 hours, until visibly puffy. Refrigerated dough may take longer.
- Dimple and finish. Preheat the oven to 425°F (220°C). Pour most of the honey garlic oil over the dough. Oil your fingertips and press deeply into the dough, almost to the bottom of the pan, creating dimples across the whole surface. Finish with fresh rosemary and flaky sea salt.
- Bake for 22 to 28 minutes, until deeply golden across the top with crisp, browned edges. Brush or spoon the remaining honey garlic oil over the warm bread. Cool 20 to 30 minutes before slicing.
Notes
- Weigh your ingredients if you can. High-hydration doughs are far more consistent by weight.
- Don't add extra flour. Wet and sticky is the point.
- Watch your water temperature. Warm activates yeast; very hot water can damage it.
- Give the dough time. Look for expansion, bubbles and puffiness rather than the clock.
- Don't skimp on the olive oil. It's part of focaccia's flavor and crisp exterior, not just non-stick insurance.
- Don't be afraid of color. Deeply golden with browned edges is what you want.
Storage
- Best the day it's baked. Store leftovers in an airtight container at room temperature for 1 to 2 days and reheat in a hot oven to re-crisp. For longer storage, freeze cooled portions in an airtight bag and reheat from frozen. Avoid the refrigerator, which speeds up staling.
From wellnesswithtia.com/2026/08/10/honey-garlic-focaccia-with-italian-00-flour/ · © Tia Ebeling